Further patterns for Christmas ornaments on my blog are the Garter Stitch Christmas Gnomes the Little Christmas Trees I published last year. Or - if you want to knit a pair of christmassy fingerless gloves, there are Zimtstern Mitts or Xmas Stary Mitts.


This work by Knitting and so on is licensed under a Creative Commons Attribution-NonCommercial-ShareAlike 4.0 International License.

Materials
- leftovers of green and white yarn - I used (really) old DK weight yarn (the bigger tree weighs 12 grams and the smaller one 8 grams)
- knitting needles that are slightly smaller than what the yarn calls for, I used 2.5 mm dpns
- a third needle for the three needle BO
- scrap yarn for provisional CO
- a crochet hook for provisional CO
Techniques & Notation
- Provisional Cast on (pCO): My favorite method for a provision CO is the crochet provisional CO - it is shown in this Youtube video by New Stitch a Day.
- Intarsia: Changing colors with the intarsia technique - as shown in this YouTube video by knitwithpat; or this YouTube video by Francoise Danoy. That way you don't have to carry long strands on the WS.
To explain the notation used in this pattern, here's an example of a typical row: "Gr (k14), Wh (k3, w+t, k3), Gr (k14)" means, k14 sts in green, change to white, k3 sts in white, wrap and turn, k3 sts in white, change back to green an k14 sts in green. - Short rows with wrap and turn (w+t): as shown in this YouTube video by Very Pink Knits.
- Three Needle Bind Off: https://youtu.be/Ph93jWSzTa0
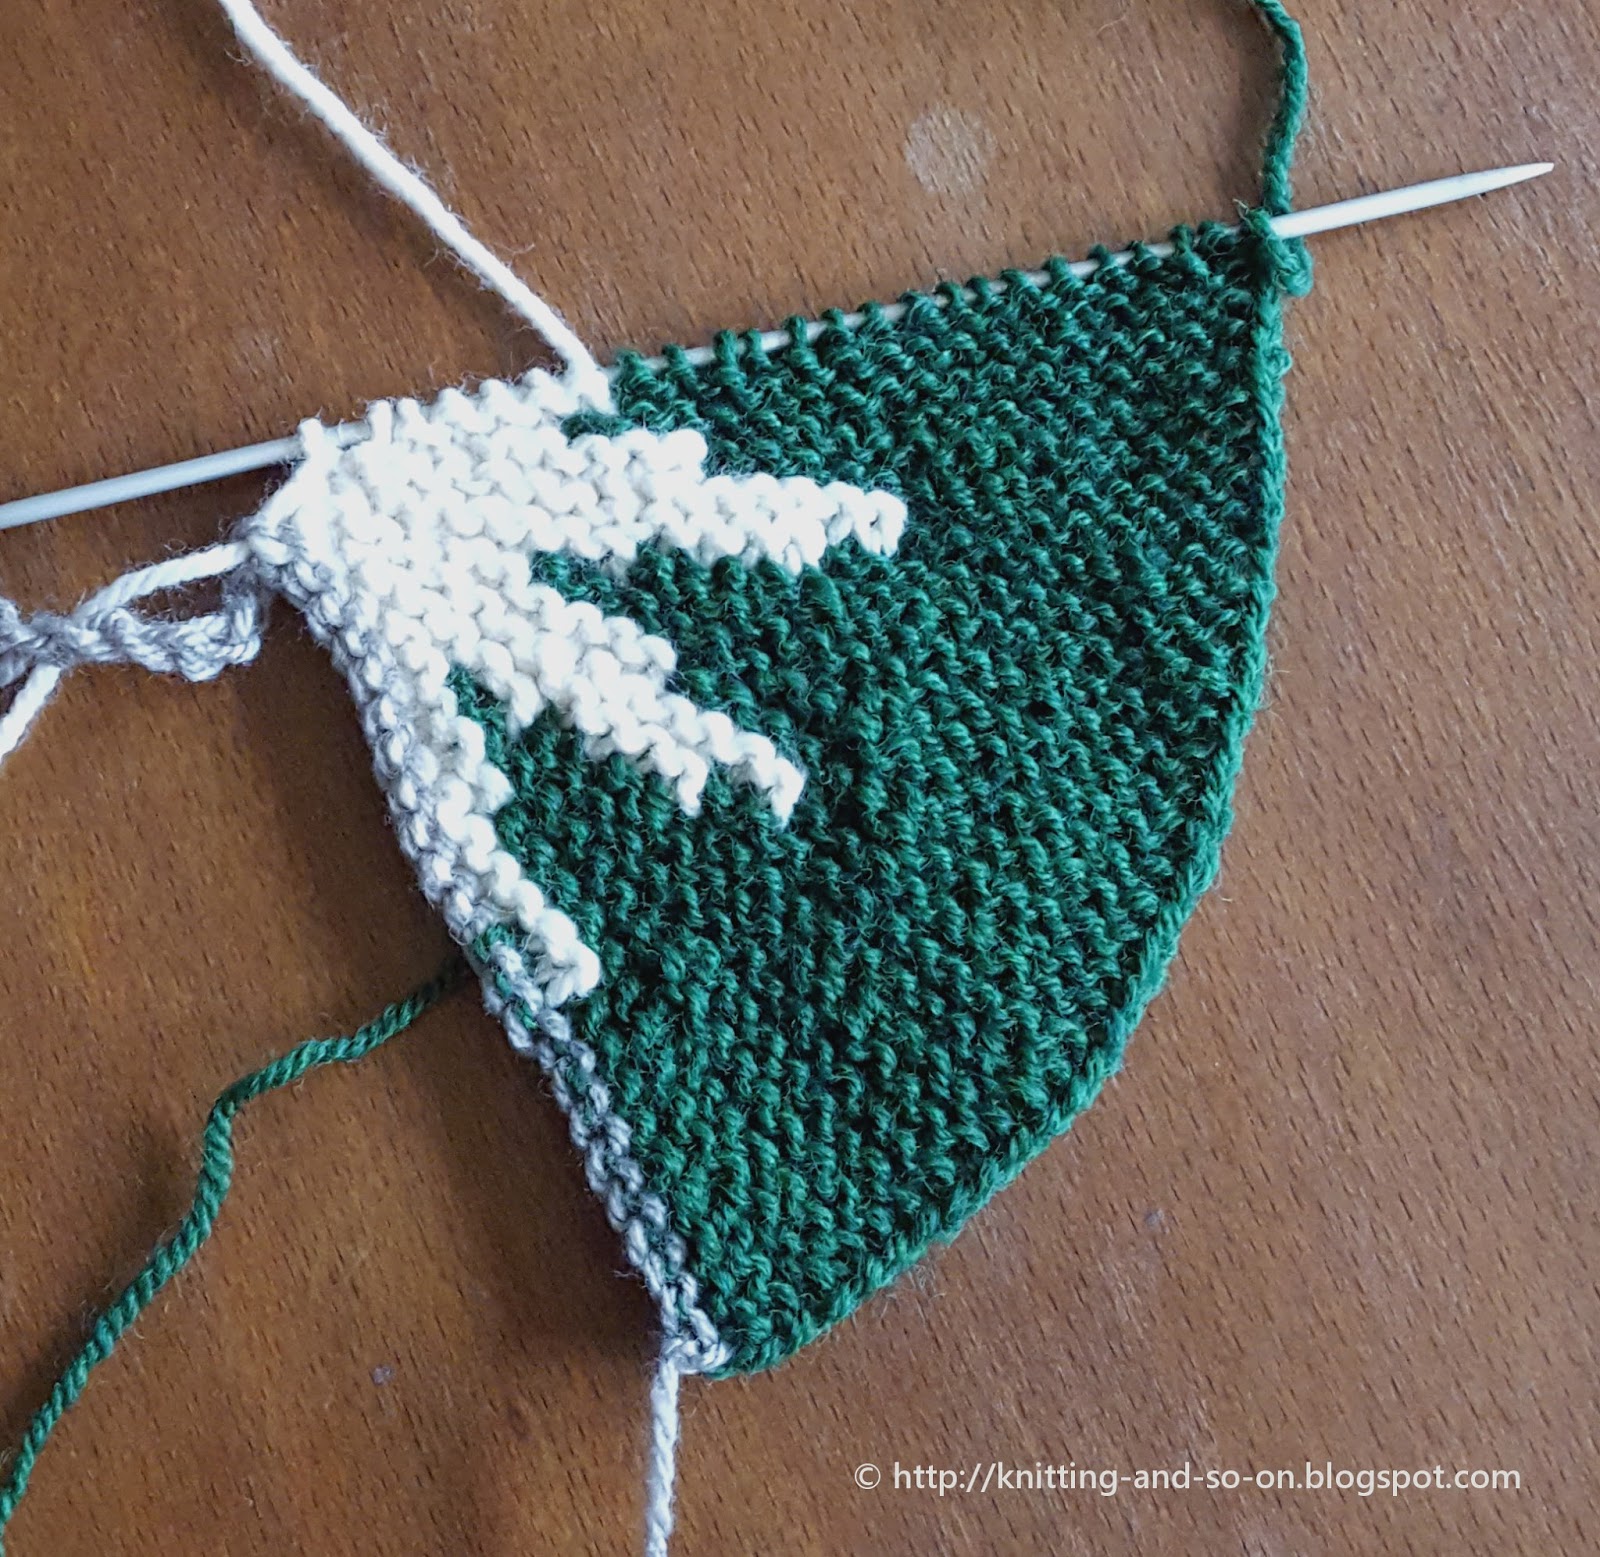
The picture below shows how the piece looks before the three-needle BO.
Instructions
Bigger Tree
With scrap yarn pCO 30 stitches, then start with your working yarns
Row 0 (Set-up row): Wh (k15), Gr (k15)
Ridge 1: Gr (k18), Wh (k2, w+t, k2), Gr (k18)
Ridge 2: Gr (k8, w+t, k8)
Ridge 3: Gr (k12), Wh (k10, w+t, k10), Gr (k12)
Ridge 4: Gr (k4, w+t, k4)
Ridge 5: Gr (k10, w+t, k10)
Ridge 6: Gr (k20), Wh (k6, w+t, k6), Gr (k20)
Ridge 7: Gr (k16, w+t, k16)
Ridge 8: Gr (k20, w+t, k20)
Ridge 9: Gr (k17), Wh (k11, w+t, k11), Gr (k17)
Ridge 10: Gr (k12, w+t, k12)
Ridge 11: Gr (k20, w+t, k20)
Ridge 12: Gr (k2, w+t, k2)
Ridge 13: Gr (k12, w+t, k12)
Ridge 14: Gr (k6, w+t, k6)
Ridge 15: Gr (k15), Wh (k15, turn, k15), Gr (k15)
Knit these ridges a total of 3 times. but only knit the RS for the last ridge.
Finishing: Put the stitches from the provisional CO on a knitting needle. Hold the piece rights sides together and do a three needle bind off. Bind off 15 stitches with green yarn, and 15 stitches with white yarn. Afterwards, turn the piece right sides out. Use a pen or something similar to get into the top.
Here's a chart of the bigger tree: each line is one ridge, i.e. two rows of garter stitch. The first number gives the number of stitches in white and the second number the number of stitches in green. The grey dotted vertical lines are included every 10th stitch to make counting easier.
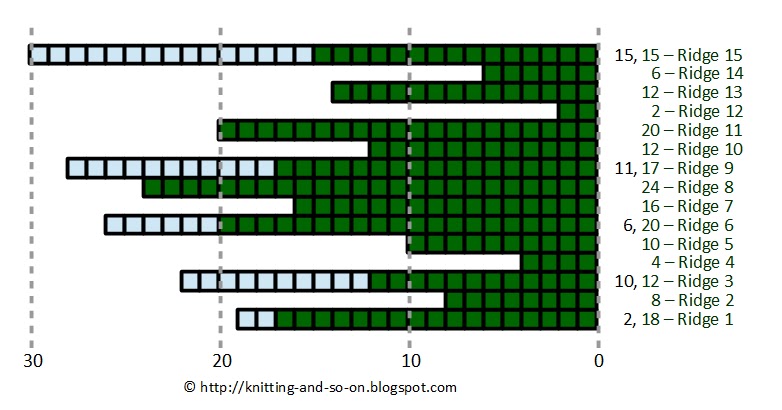 |
| Chart for bigger tree - click to enlarge |

Smaller Tree
With scrap yarn pCO 24 stitches, then start with your working yarns
Row 0 (Set-up row): Wh (k12), Gr (k12)
Ridge 1: Gr (k10), Wh (k6, w+t, k6), Gr (k10)
Ridge 2: Gr (k14, w+t, k14)
Ridge 3: Gr (k4, w+t, k4)
Ridge 4: Gr (k15), Wh (k5, w+t, k5), Gr (k15)
Ridge 5: Gr (k8, w+t, k8)
Ridge 6: Gr (k18, w+t, k18)
Ridge 7: Gr (k10, w+t, k10)
Ridge 8: Gr (k13), Wh (k9, w+t, k9), Gr (k13)
Ridge 9: Gr (k6, w+t, k6)
Ridge 10: Gr (k12, w+t, k12)
Ridge 11: Gr (k2, w+t, k2)
Ridge 12: Gr (k12), Wh (k12, turn, k12), Gr (k12)
Knit these ridges a total of 3 times. but only knit the RS for the last ridge.
Below you find a chart of the smaller tree.
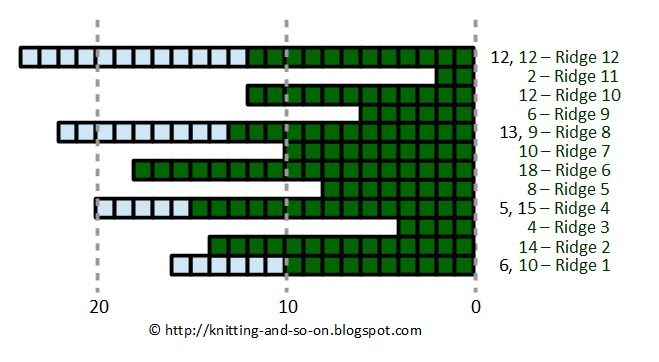 |
| Chart for smaller tree - click to enlarge |
Finishing: Put the stitches from the provisional CO on a knitting needle. Hold the piece rights sides together and do a three needle bind off. Bind off 12 stitches with green yarn, and 12 stitches with white yarn. Afterwards, turn the piece right sides out. Use a pen or something similar to get into the top.
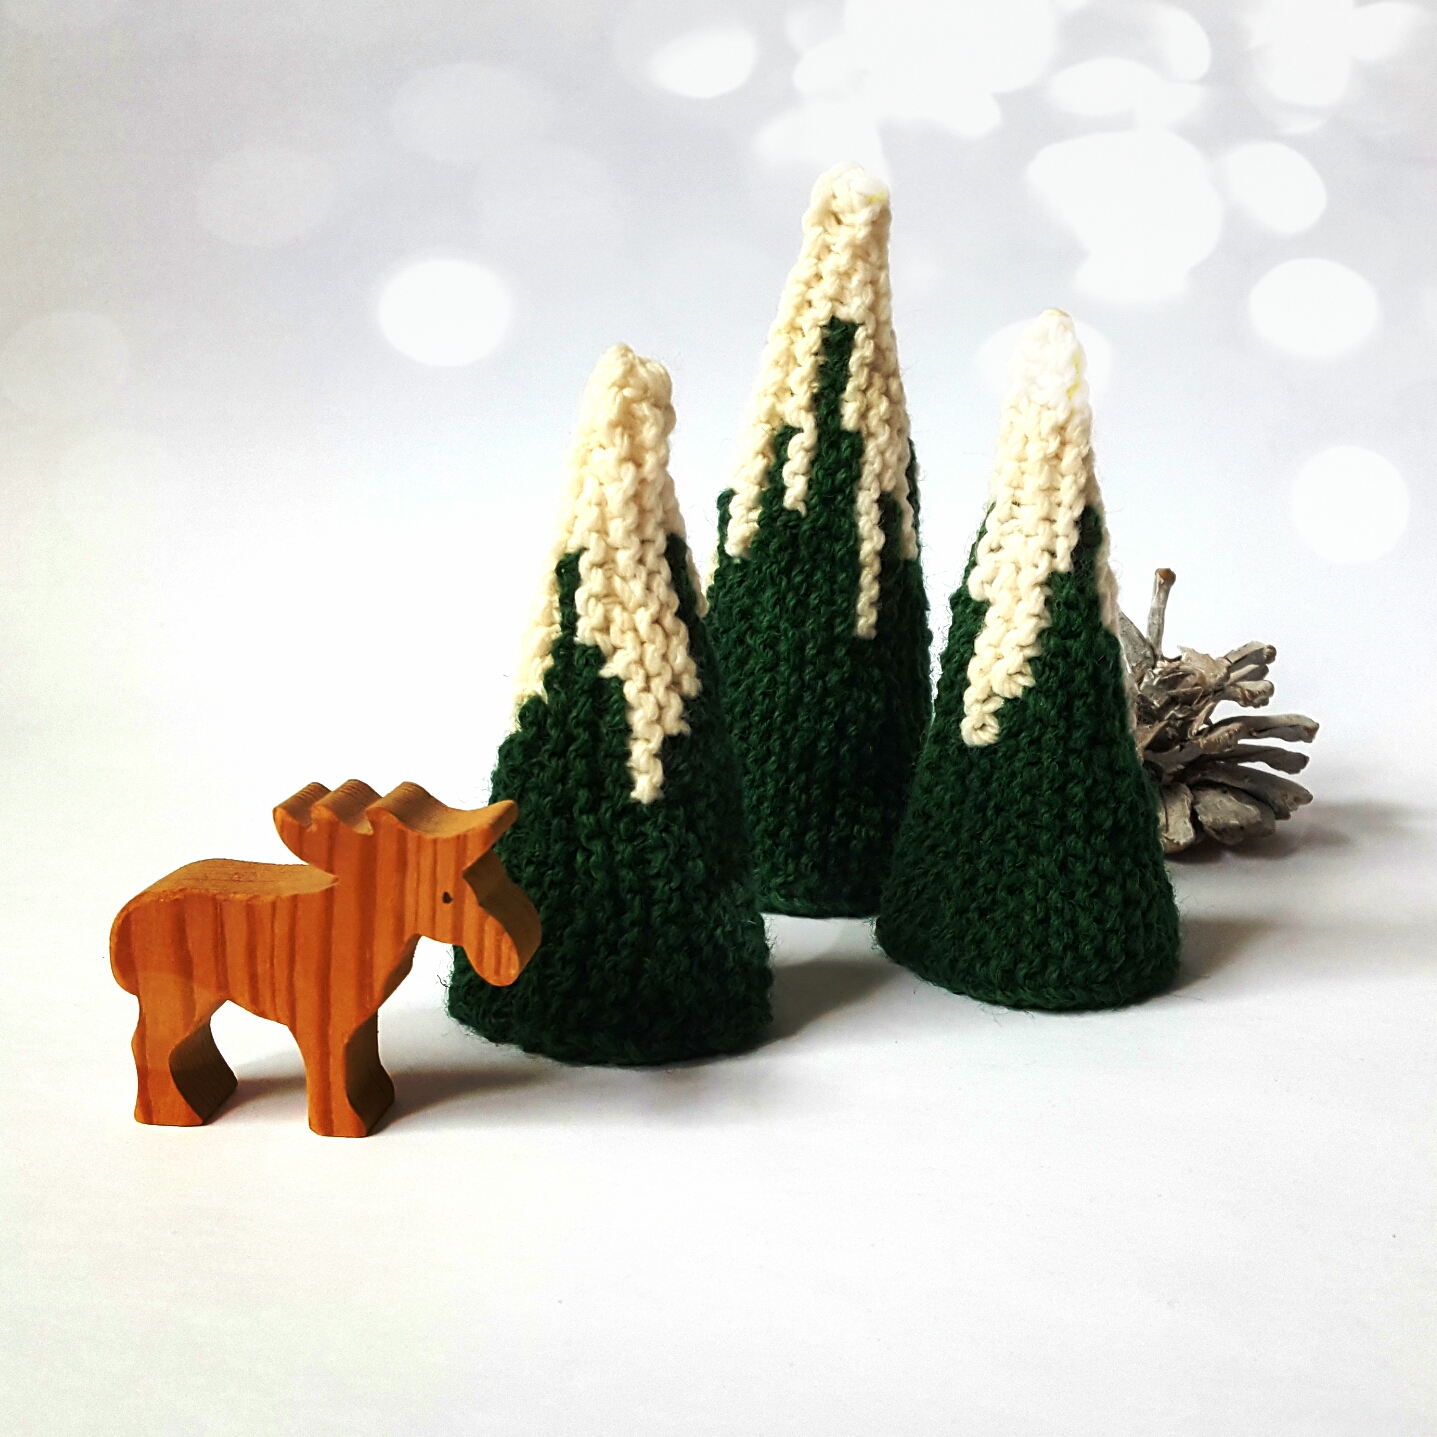


Thank you! I love these trees, and am off to find my green and white yarn. (I also love the wooden reindeer.) Dot
AntwortenLöschenThanks ♥ The reindeer was a present when I was still at school. I only found it recently at my parents' place and it was too cute to not be included in the photos :)
LöschenHappy knitting ♥