Montag, 22. Juni 2015

Tips to Knit A Striped Top-Down Sweater without A Pattern

When I'm planning to knit a sweater, I'm usually too lazy to search for a knitting pattern and too unconcentrated to follow a pattern through.

Even though most sweater patterns that I have knitted (e.g. Corinne cardigan by Crystal Erb Junkins) were great and beautifully written, I tend to be unwilling to really follow the pattern. Following a pattern seems to take more of my concentration than trying something of my own. (And I want to be clear that up until now it's never been the pattern's fault, but just me being me.)

This blog post is NOT A PATTERN (far from it) but a collections of tools, techniques and links that can help you when you're designing and knitting a similar sweater yourself.

In this post I assume that your already familiar with the general concept of a top-down raglan sweater. If you've never done this, here's a nice blog post by Knitting Pure and Simple that explains the idea or try to read this Raglan tutorial by Kirsten Tendyke - or knit a top-down pattern such as Buttercup by Heidi Kirrmaier or Gemini by Jane Richmond. (Here's a list of the free, knitted top-down sweaters on Ravelry; you must be logged in to make this link work.)


Creative Commons License
This work by Knitting and so on is licensed under a Creative Commons Attribution-NonCommercial-ShareAlike 4.0 International License.


Measuring, swatching and planning raglan increases

Usually, I don't like knitting swatches - for smaller projects (fingerless gloves etc.), it's just not worth my while. Even if it doesn't fit, I generally can see this early enough, i.e. after about the same time, it'd take to knit the swatch. However, everytime I skipped swatching for a sweater or another big project, I only ended up just knitting a bigger swatch, like half a sweater or two thirds of a cardigan. Therefore, I really (REALLY) recommend knitting a swatch in garter stitch for anything a big as a sweater.

The best way to take measurements is to use another sweater that really fits you well. The measurements depend on the type of sweater you want to knit (e.g. for a V-neck sweater, you'd want to measure the depth of the neckline) - the raglan calculators (listed below) require different measurements.

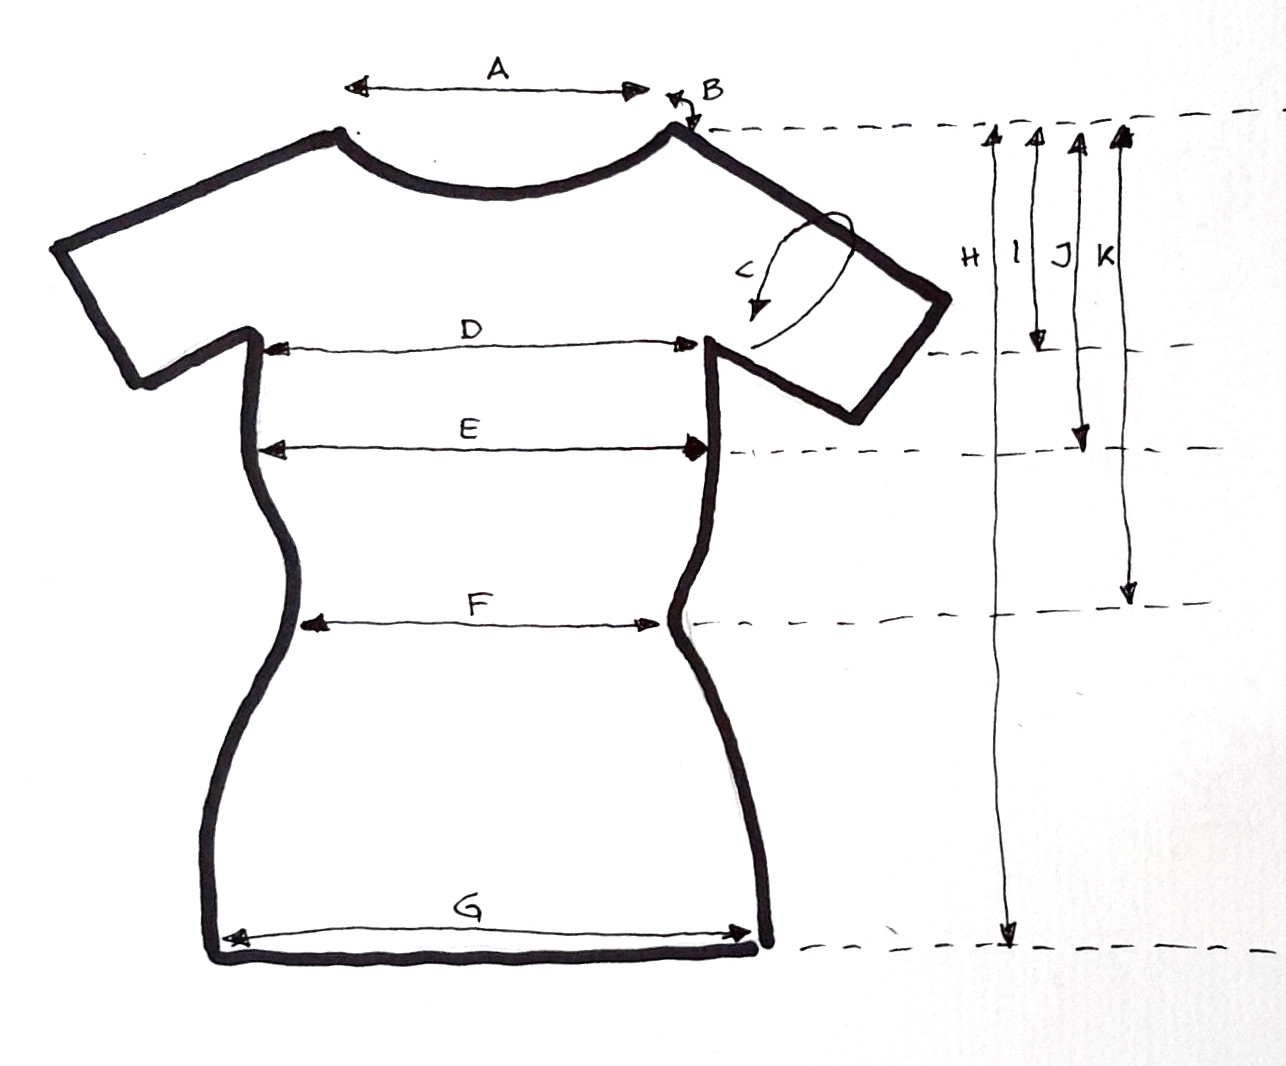
For the sweater in this picture, I measured according to this picture. A is the width of the neckline, and B the width of the arm part. I knitted in the round (stitches for A, stitch marker, stitches for B, stitch marker, stitches for A, stitch marker, stitches for B, stitch marker - join in round).

To know how to increase, you can use one of the following raglan calculators:


To be honest, I have never used any of these calculators, I prefer to do increases around the stitch markers - and stop increasing when I have reached the desired width (C or D) and then going on without increasing until the yoke piece is long enough (I). But if you want to distribute your increases evenly over the length of your yoke, you should calculate your increases.

After finishing the yoke part, I put the arm stitches on scrap yarn, cast-on a few underarm stitches and placed a stitch marker at the middle of my underarm stitches.


Increases and decreases for a fitted sweater

In order to knit a fitted sweater, I'd measured my chest (E), my waist (F) and the width at the sweater's lower edge (G) - as well as the corresponding heights (I, J and K). To fit the sweater to my size, I knitted increases and decreases at the underarm stitch markers, i.e. down the sides of the sweater.


Traveling jogless stripes

When knitting stripes in the round, the color change can be seen as a visible jog.

A technique to avoid this is called traveling jogless stripes, which is done as follows: When changing to another color knit one round of that new color; when reaching the first stitch of that color, slip that stitch purlwise and replace the marker that indicates the beginning of your round from before that stitch to behind that stitch. This way the beginning of the round keeps traveling as long as you keep changing colors.

A more detailed explanation can be found at techknitting blog or in this YouTube video by New Stitch a Day.


Carrying yarn up

If you're anything like me, you'd want to avoid having to cut your yarn everytime you change colors (and consequently to avoid too many ends to weave in) and at the same time to avoid long floats on the WS of your piece,

To do this you have to connect the yarn in the color that's not used every few rows, i.e. when you come to the end-of-round marker, wrap it around your working yarn before knitting the next stitch.

The technique is shown in this YouTube video by karin kelly-burns.

The photo on the right shows how the WS looks when using both the jogless stripe technique while carrying up your yarn.


Avoiding holes at the underarm stitches

I always pick up more stitches under the arm than I have cast-on after the yoke part. Usually, about 2 at the side (i.e. the gap between the last arm stitch from my scrap yarn and the stitches cast-on after the yoke), than the cast-on stitches and two more at the other side. In the next two rows, I usually decrease the stitches from the gap. This avoids the potential holes.

Here's a YouTube video by TheKnittingArts that shows this technique.


How to try it on while knitting

If you want to check whether the sweater fits you, you need to be able to try it on while it's still on the needles. This is easier, if you do the following:

  • Put all arm stitches on a long piece of scrap yarn - at least twice as long as the circumference of your upper arm (and secured with a slipknot). That way the hole is big enough to let your arm through when trying it on.
  • For the body part, it helps to distribute the stitches on two circular needles before trying it on (e.g. I have two 4.5mm circulars that I used for the pictured project - one 80 cm and one 60 cm). Afterwards, you can go on knitting with one needle.


Freitag, 19. Juni 2015

Summer Top

If you have read some of the patterns published on this blog, you'll know that I like short rows ... and I usually apply the to make scarfs or fingerless gloves, i.e. small accessories. However, I wanted to apply this technique to something more substantial and wearable: a summer top.

For this project, I measured an old sweater that fits me well and I actually knitted a swatch ... something I usually avoid. Then I "calculated" the stitches to be cast on and started from the top as with any Raglan sweater. 

As far as I can tell, the new top will fit nicely - I only have to finish the arms (they'll be short) and to weave in ends ... Right now it looks a bit crumpled, it's been in a bag while I was travelling, but I'm sure it will look better after blocking :)


Not sure whether I will manage to write this down as a readable pattern or rather knitting recipe.

EDIT August 2016: I have published a (slightly altered) version on my blog - it's called Summertime Garter Stitch Top.

Dienstag, 2. Juni 2015

Ojos de Bruja Scarf

Something warm, yet light for spring or summer evenings – easy to knit but with a certain “lacy” optic, the Ojos de Bruja scarf is the perfect accessory. It is knitted from side to side and all in garter stitch.

It is great for using the beautiful yarn in the wildest colors that has been in your stash for so long. Due to its short row construction and varying width, colors will be distributed nicely and color pooling isn’t very probable.


Creative Commons License
This work by Knitting and so on is licensed under a Creative Commons Attribution-NonCommercial-ShareAlike 4.0 International License.


Fellow raveler mariarosaknits (from Fili & Colori - The Knitting Room) has written an Italian version of this pattern - it is available here.
She also made a YouTube video to explain the techniques (with "subtitles" both in english and italian) - here on YouTube. Thank you, this is great!

A Danish translation of this pattern was written by Marianne Holmen from strikkeglad.dk - it is available here.


Materials
  • about 210 grams of fingering weight yarn, however, the pattern is written in a way that it can be adapted to any yarn weight (therefore, gauge doesn’t really matter).
    The yarn that I used here (Jitterbug 400 by Colinette - colorway Jamboree) is listed on Ravelry as a fingering weight yarn - however, it has only 400 yards to 150 grams (whereas all the fingering yarn I used before has 400 yards to 100 grams) - that gave me a scarf of about 175 cm length, and 42 cm width at its widest point.
  • 3.75 mm needles

Techniques
  • Short rows with double stitches (German short rows, t+p): when you turn, bring yarn to the front and pull it back so that a sort of "double-stitch" is created, then knit back as usual - when you have to knit the double-stitch, make sure to knit it as one stitch (see also this YouTube video); this method has the advantage the no picking up of stitches is necessary. In the pattern, this stitch will be called t+p (turn and pull).
  • Backwards Loop CO: See this YouTube-Video from planetpurl.


Instructions

CO12
Row 0 (WS): sl1, k to end

Increasing Section

For each section, you will have to calculate a number X, that tells the distance between the "t+p's . It is calculated as
    X = (number of stitches when beginning the section PLUS 3) DIVIDED BY 5

This looks more complicated than it actually is, for the first section X is 3 = (12+3)/5 ... and X will increase by one for every knitted section (i.e. for the second section X is 4, for the third section X is 5 etc.), because the stitch count increases by 5 for each section.

Rows 1, 2 (RS, WS): sl1, kfb, k to end // turn // sl1, k to end
Rows 3, 4 (RS, WS): sl1, kfb, k to end // turn // sl1, k to end
Rows 5, 6 (RS, WS): sl1, kfb, k to end // turn // sl1, k to end

Rows 7, 8 (RS, WS): sl1, k to Xth st before end, t+p, k to end
Rows 9, 10 (RS, WS): sl1, k to Xth st before last wrap t+p, k to end
Rows 11, 12 (RS, WS): sl1, k to end // turn // sl1, k to last 10 sts, BO5, k5
Rows 13, 14 (RS, WS): sl1, k4 // turn (do not wrap) // sl1, k4
Rows 15, 16 = Rows 13, 14
Rows 17, 18 = Rows 13, 14
Rows 19, 20 = Rows 13, 14
Rows 21, 22 (RS, WS): sl1, k4, CO7 (backwards-loop CO), k to end // turn // sl1, k to last before CO, ktbl, k7, ktbl, k to end
Rows 23, 24 (RS, WS): sl1, k to 2*Xth st before end, t+p, k to end
     ["2*X" = X multiplied by 2]
Rows 25, 26 (RS, WS): sl1, k to Xth st before end, t+p, k to end

Row 27 (RS): sl1, k to end
Rows 28, 29 (WS, RS): sl1, k to Xth st before end, t+p, k to end
Rows 30, 31 (WS, RS): sl1, k to Xth st before last wrap t+p, k to end
Rows 32, 33 (WS, RS): sl1, k to Xth st before last wrap t+p, k to end
Rows 34, 35 (WS, RS): sl1, k to Xth st before last wrap t+p, k to end
Row 36 (WS): sl1: k to end

Repeat increasing section until you have reached about half of the desired length of your scarf.
(I knitted a total 13 increasing sections.)
Then knit the middle section once.

Middle Section

For the middle section X is calculated as for the increasing section - it will be one higher than it was for the last increasing section.

Rows 1, 2 (RS, WS): sl1, kfb, k to end // turn // sl1, k to end
Rows 3, 4 (RS, WS): sl1, kfb, k to end // turn // sl1, k to end
Rows 5, 6 (RS, WS): sl1, kfb, k to end // turn // sl1, k to end

Rows 7, 8 (RS, WS): sl1, k to Xth st before end, t+p, k to end
Rows 9, 10 (RS, WS): sl1, k to Xth st before last turn, t+p, k to end
Rows 11, 12 (RS, WS): sl1, k to end // turn // sl1, k to last 10 sts, BO5, k5
Rows 13, 14 (RS, WS): sl1, k4 // turn (do not wrap) // sl1, k4
Rows 15, 16 = Rows 13, 14
Rows 17, 18 = Rows 13, 14
Rows 19, 20 = Rows 13, 14
Rows 21, 22 (RS, WS): sl1, k4, CO5 (backwards-loop CO), k to end // turn // sl1, k to last before CO, ktbl, k5, ktbl, k to end
Rows 23, 24 (RS, WS): sl1, k to 2*Xth st before end, t+p, k to end
Rows 25, 26 (RS, WS): sl1, k to Xth st before end, t+p, k to end

Rows 27, 28 (RS, WS): sl1, ssk, k to end // turn // sl1, k to end
Rows 29, 30 (RS, WS): sl1, ssk, k to end // turn // sl1, k to end
Rows 31, 32 (RS, WS): sl1, ssk, k to end // turn // sl1, k to end

After finishing the middle section (once), knit start with the decreasing sections.

Decreasing Section

The number X for this section is the number of stitches minus 2, and that result divided by 5.
For the first decreasing section, it will be as high as for the last increasing section - decreasing by one for each section.

Row 1 (RS): sl1, k to end
Rows 2, 3 (WS, RS): sl1, k to 4*Xth st before end, t+p, k to end
Rows 4, 5 (WS, RS): sl1, k up to and including last wrapped stitch, k X sts, t+p, k to end
Rows 6, 7 (WS, RS): sl1, k up to and including last wrapped stitch, k X sts, t+p, k to end
Rows 8, 9 (WS, RS): sl1, k up to and including last wrapped stitch, k X sts, t+p, k to end
Row 10 (WS): sl1: k to end

Rows 11, 12 (RS, WS): sl1, k to Xth st before end, t+p, k to end
Rows 13, 14 (RS, WS): sl1, k to Xth st before last wrap t+p, k to end
Rows 15, 16 (RS, WS): sl1, k to end // turn // sl1, k to last 12 sts, BO7, k5
Rows 17, 18 (RS, WS): sl1, k4 // turn (do not wrap) // sl1, k4
Rows 19, 20 = Rows 17, 18
Rows 21, 22 = Rows 17, 18
Rows 23, 24 = Rows 17, 18
Rows 25, 26 (RS, WS): sl1, k4, CO5 (backwards-loop CO), k to end // turn // sl1, k to last before CO, ktbl, k5, ktbl, k to end
Rows 27, 28 (RS, WS): sl1, k to 2 *Xth st before end, t+p, k to end
Rows 29, 30 (RS, WS): sl1, k to Xth st before end, t+p, k to end

Rows 31, 32 (RS, WS): sl1, ssk, k to end // turn // sl1, k to end
Rows 33, 34 (RS, WS): sl1, ssk, k to end // turn // sl1, k to end
Rows 35, 36 (RS, WS): sl1, ssk, k to end // turn // sl1, k to end

Repeat decreasing section as many times as you knitted the increasing section (there should be only 12 sts on your needles now). Bind off.

Weave in ends and block.


This pattern has been featured on the Knitting Love Monthly Link Party! Thank you!